Friday, October 11, 2024
es-ESen-USpt-BR


You are here  >  Tech Support  >  Software setup

MaGest.

MaGest.

Invoicing and Management Software totally integrated with the rest of the products of MICROAREA guarantees the user the inter-performance of our accounting, taxation, and payroll software, and much more...

MaGest has been designed to provide the company, independently of its size or activity, an easy to use system of invoicing, storing and commercial management without abandoning the services that the company demands.

This new version provides a new and more effective method of working. Finally, all the processes of production, storing, invoicing, management of commercial contacts and automatic accounting fuse into one product.  When can we start working?


POShability- Terminal Sales Point

POShability- Terminal Sales Point

With a strong heart: taking advantage of the nucleus of Magest, we bring the potency of a complete package of commercial management to your sales terminal. A revolutionary, simple interface, within reach of any of its employees will demonstrate the potency of the client applications of POShability working against the application server with the capacities of a giant.
Never again work with a TPV that doesn´t link to your management.


MicroArea for Attorneys

MicroArea for Attorneys

This is the ideal software for lawyers and law firms, as it creates order and efficiency in your law practice. MicroArea for Attorneys provides all the professional services lawyers need to manage their cases and clients. Selected by the most european BAR ASSOCIATIONS to provide a standard software to their lawyers, the software has been converted in the standard tool for the biggest BARs of Europe.

Everything you need to manage your law practice…

Make more time to practice law, not manage it. Efficient, Affordable and Easy-to-Use. Work smart, not hard...


Need help during installation?

Live chat by SightMax
Our technicians are at your disposition. you can initiate a live chat by clicking on the image to the left. If you are member of one of our technical support programs you can call at 1-347-408-0445  as well or make a paid consultation by clicking here.  

Don´t forget to consult the considerations before installation page if you are an advanced user.
 

Installation Guide

MaGest Installation Guide
PosHability Installation Guide
MicroArea for Attorneys Installation Guide

Program Installation


You should verify that you have a backup of all data on all machines.

To install any of our products you will need to decide on the type of installation that you wish to carry out:
Insert the product CD-ROM supplied by Micro Area. If you are trying to install on a LAN, ensure that the server version of the software is installed first. After inserting the CD-ROM the installation wizard will automatically start. If after a few minutes the program does not start, it is possible that you are experiencing problems with your computer. To find a solution, click on “My PC” or “Equipment” (Vista). If you cannot open the disk verify that your CD Drive is working. The CD can also be tried on other machines; if this fails we have a version that can be downloaded from the internet.

Under normal conditions the wizard is launched totally unattended allowing you to choose between:

Install the product.
• Quick guide of installation checks.
• Information about the Suite products and their manuals.
• Quit the wizard.

After leaving the installer program, more information is required about the organization and the user registering the program.
If you are working with Windows 2000 or above you will have two additional options, to install the program for all users or only for the active user.  If you choose the second option, you will be able to verify that the active user has administrative permission to carry out the installation of the program.

Installation Folder: The installer will ask for the path in which the program files will be copied, offering a default path.  To change it, you must press the button to examine and select the destination folder.

Type of Installation: Choose between one of the following types of installation:

Server Installation: The program installs the product and the SQL Server or MSDE engine.  Do not attempt the installation in server mode with Windows 95, 98, and ME - these operating systems are not capable of initiating the services.  This option must be executed on the equipment that acts as the network server.  
The installer will automatically detect if a version of MS SQL Server is available in your equipment.  If so, the wizard will omit that part of the process.

Installation in client mode: The program installs without activating the services of the SQL Server and, therefore, is the appropriate choice for installation on client machines.  This type of installation is supported on any Windows operating system.

Customized Installation: Allows you to customize the installation based on your needs.

IMPORTANT NOTE ABOUT MICROSOFT OPERATING SYSTEMS:
Microsoft supports and solves the problems detected in the different versions of its operating system through ¨patches¨ or ¨service packs.¨  It should verify that the latest updated version is available on your computer.  If you are unsure that your operating system is up to date, use the WINDOWS UPDATE option which can be activated on-line at:
http://windowsupdate.microsoft.com/

If you already have MICROSOFT SQL SERVER or MSE installed on your server, the installation can be carried out directly in client mode.  To begin the program, you will be required to enter the connection settings with the database manager. 
File Copy.  Having reached this point, the installer begins copying files to disk.

Finishing the installation.

After the files are copied, press the button to finish the installation of the software.  Depending on the version you have installed, the wizard will proceed to install MDAC or MSDE.  The latter is a simplified version of SQL Server that will allow you to manage the databases.  If you already have Microsoft SQL Server installed, there is no problem as the application will choose that as its predetermined database server.

Have at hand the telephone number of our technician department if you need consultation or if you have any doubt during the installation process:

DO NOT FORGET TO RESTART WINDOWS AFTER FINISHING THE INSTALLATION.This is recommended although the system does not require it. By doing this, we are assured that all of the operating system services are initiated properly. 
After installing a product, whenever you have chosen the installation in server mode and a version of SQL Server or MSDE is not made available, assistance will begin for the installation of MSDE.  Later, the service for which the product is operative will be activated.

Application Registration

 The software of Micro Area is required to be activated to ensure access to automatic updates. To do so, the first time the software is used, you will have to activate it using the wizard for the registration of the application.

You will have to correctly provide the required information of your office.  Without doing so, the product will not be able to obtain automatic updates and will be deactivated after a short period of use.  Do not omit any of the fields.  All of them must be filled in.  If you leave any of them blank the ¨Next¨ button will not activate and the process will not be completed.

Although you are able to activate the product by using incorrect information, the system will verify that the information provided is consistent with your member number.  The information that you enter here will be processed in an absolutely confidential register.

Once the information is filled in, click the ¨Next¨ button.  This will allow us to register the application by internet.

You should be sure that an internet connection is available during the time of registration.  When you click the button to begin registration, the program will connect with the Micro Area registration server and will register your product.  A message will appear that will inform you that the product is registered.  At this point, you are able to close the registration wizard and return to run the application.
 

Initial Configuration

 After completing the registration process, a wizard will be activated for allowing you to select an SQL server.  The first combination contains the list of SQL servers detected in your local network.
The device in which it is installed is named (Local).  Next it lists the rest of the servers in your network.

The default settings for the installation are:
LOCAL SERVER INSTALLER
Server: (Local)
User:  sa.  (in lowercase letters)
Password: you will have to leave this field blank.

Next, select the type of security for the start of the session.  It is recommended to use the SQL Server security.

Installation of Network Connection

Server: Write the IP address of the machine that is acting as the server or select the name from the list of servers that the wizard will display.
User: sa. (in lowercase letters)
Password: you will have to leave this field blank.

Next, select the type of security for the start of the session. You must use the security of the SQL server.

If you do not know how to obtain the IP address of the machine that is acting as the server, click the Start button on your server. Select ¨Run¨, type CMD, and push the ¨OK¨ button. After this, a screen from the system console will open. Type IPCONFIG and press ENTER. Then you must enter the sequence of numbers and marks that you will find after the ¨IP Address¨ legend.

IMPORTANT: If you already have a SQL Server installed on your network, contact the network administrator. The administrator can provide you with the username and password with sufficient permit.

Uninstallation of Software

To uninstall a product:

1.Open Control Panel: Start > Control Panel
2.Double-Click on the icon “Add or Remove Programs”
3.Select the program which you wish to uninstall
4.Click “Add or Remove”
5.Click “Accept”
6.Select the option “Uninstall” or “Repair”

Repairing a program places the new installation of the program over the path of the first installation, repairing and substituting the incorrect files that the installer is able to find.
Remember that it is advisable to always make a backup of the product before carrying out a repair.
If you uninstall the product, some files which were created after the installation of the program will remain. These should be eliminated manually.

Installation in Remote Client Mode

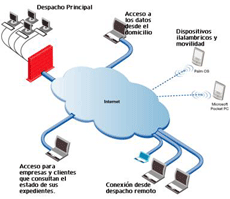
We use this option to connect clients through the Internet or by means of a VPN (Virtual Private Network). It is essential to have access to an ADSL connection or a VPN connection. In either case, they will have to possess an IP publicly facilitated by your internet provider.

The configuration for this service:
Server: Write the IP provided by your ISP.
User: sa. (in lowercase letters)
Password: you will have to leave this field blank.
After configuring the connection settings with the server, the assistant will ask you to perform the following processes:

  • Search for product updates
  • Begin the application


Contact

NY Financial District Center 17
State Street Suite 4000
New York, NY 10004 U.S.A.
Phone: +1 646 998 8160
Fax: +1 716 242 3222

http:// www.microarea.us